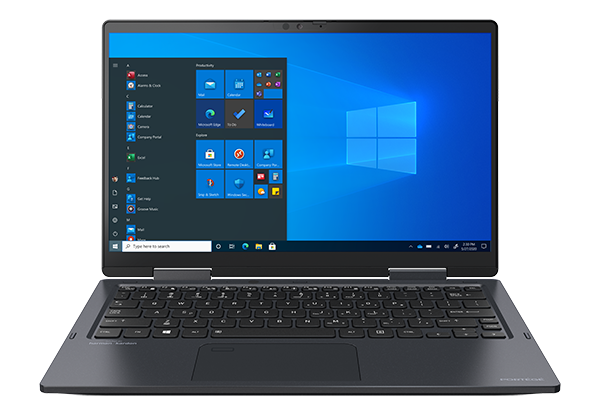
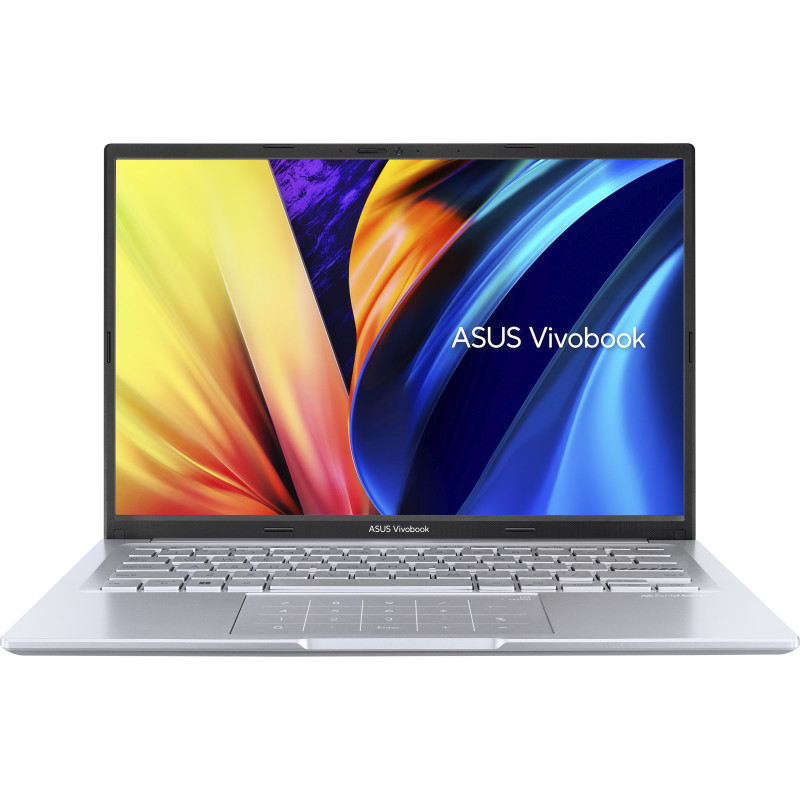
A Complete Guide to Replacing and Charging Arlo Camera Batteries

Understanding Arlo Battery Replacement

For many users, knowing when and how to replace Arlo battery is essential to keeping their security system working without interruption. Over time, the power capacity of any battery will naturally decrease, meaning you may notice shorter recording times or more frequent low-battery alerts. Replacing the battery ensures that your camera remains reliable, whether it’s monitoring your home entrance, backyard, or office.

Choosing Rechargeable Arlo Camera Batteries

One of the most popular options today is using Arlo camera batteries rechargeable. These batteries are designed to be recharged multiple times, reducing waste and cutting down the need to constantly buy new power cells. For users who have multiple cameras installed, rechargeable batteries can be especially practical since they allow you to rotate charged units in and out without extended downtime.

How to Remove Arlo Camera to Charge

If you’re new to the system, you might wonder how to remove Arlo camera to charge. The process is straightforward: gently press the release button on the mounting bracket, slide the camera off, and bring it indoors for charging. Some users prefer to swap in a fully charged spare battery immediately, which minimizes any monitoring gaps. This approach is highly convenient if your cameras are installed in hard-to-reach places.

How to Remove Arlo Camera from Housing

Another common question is how to remove Arlo camera from housing. The housing is designed to keep your camera secure and weather-resistant, but it is built with an easy release system. With a light press on the latch or push mechanism, the camera can be safely detached from its mount. Once removed, you gain access to the battery compartment for replacement or charging. Knowing this process makes battery maintenance much smoother and less intimidating.

Tips for Extending Battery Life

To reduce the frequency of replacements, there are a few habits worth following. Adjusting the camera’s sensitivity settings, lowering the video resolution when possible, or setting custom recording schedules can all help extend battery life. Positioning the camera in a location with stable Wi-Fi also ensures less power is consumed during transmission.

Final Thoughts

Maintaining your security cameras doesn’t have to be complicated. Whether you need to replace Arlo battery, switch to Arlo camera batteries rechargeable, learn how to remove Arlo camera to charge, or figure out how to remove Arlo camera from housing, the process is designed to be simple and user-friendly. By following these steps and adopting a few battery-saving practices, you’ll keep your Arlo system running smoothly for the long term.

ER14250 Battery NZ: Everything You Need to Know About This Compact Power Source

Introduction to the ER14250 Battery

The ER14250 battery NZ is a compact yet powerful lithium battery that is widely used in electronic devices requiring long-lasting energy storage. With its high energy density and reliable performance, it is particularly popular in industrial automation, smart meters, and backup systems. Because of its small cylindrical design, it is often compared to the 1/2 AA battery, making it an efficient choice for devices where space is limited.

Understanding the ER14250 Battery Equivalent

When discussing compatibility, many users look for the ER14250 battery equivalent to ensure they can replace or match this battery with other available models. The ER14250 is essentially a 1/2 AA size lithium-thionyl chloride battery, operating at 3.6V. This makes it interchangeable with other 1/2 AA lithium batteries, provided that the device specifications match. It is essential, however, to verify voltage, chemistry, and dimensions before selecting an equivalent to avoid any performance issues.

The Role of the 1/2 AA Battery NZ

In New Zealand, the demand for compact lithium batteries continues to grow, especially in industrial sectors. The 1/2 AA battery NZ is often used in equipment where standard AA batteries would be too large. Because of its size and reliability, it powers devices such as sensors, alarms, medical equipment, and programmable logic controllers (PLCs). For example, the ER14250 is compatible with Delta programming models such as DVP-08EH, DVP-16EH, DVP-20EH, DVP-32EH, DVP-40EH, EHDVP-48EH, DVP-64EH, and DVP-80EH, ensuring stable performance for industrial operations.

Applications and Benefits

One of the main advantages of the ER14250 battery is its long shelf life, often exceeding 10 years when stored properly. This makes it ideal for backup systems and applications where frequent replacement is not practical. Its ability to deliver consistent power even in extreme temperature ranges further enhances its reliability. For industries in New Zealand that rely on uninterrupted power, the ER14250 and its equivalents play a crucial role in maintaining system stability.

Choosing the Right Battery in New Zealand

When selecting an ER14250 battery NZ or searching for its equivalent, it is important to focus on quality and compatibility. Industrial equipment, especially automation systems, requires stable and precise power sources. Checking the manufacturer’s recommendations and ensuring that the chosen 1/2 AA battery NZ meets voltage and size requirements is key to avoiding operational disruptions.

Conclusion

The ER14250 is more than just a small lithium battery—it is a trusted power source for industrial, medical, and technological devices. Whether you are looking for the ER14250 battery equivalent or searching specifically for a 1/2 AA battery NZ, this compact energy solution provides long-lasting reliability. Its compatibility with Delta programming controllers and other professional equipment highlights its importance in both everyday and specialized applications.

Maximizing Your UE Boom: Battery Tips and Troubleshooting Guide

Understanding Your UE Boom Battery Life
Knowing your UE Boom battery life is essential for uninterrupted music playback. Battery longevity can vary depending on volume levels, usage patterns, and charging habits. To make the most of your device, it’s helpful to monitor the battery regularly and understand when it might need a recharge or eventual replacement. Good battery maintenance ensures that your UE Boom continues delivering high-quality sound without unexpected shutdowns.

How to Check UE Boom Battery
To keep track of your speaker’s power, it’s important to know how to check UE Boom battery. This can usually be done through the UE Boom app, which provides a precise battery percentage. Some models also allow you to check battery levels using the speaker’s LED indicators, giving you a quick glance at how much power remains. Regularly checking your battery helps prevent mid-playlist interruptions and prolongs overall battery life.

How to Tell if UE Boom is Charging
Sometimes it’s not clear whether your speaker is charging properly. Knowing how to tell if UE Boom is charging can prevent potential issues. When connected to a power source, the speaker’s LED light will usually indicate charging status—either steady or flashing. This visual cue ensures you know your device is receiving power and can save you time troubleshooting later.

Why is My UE Boom Charging Light Flashing
If you notice unusual behavior, such as why is my UE Boom charging light flashing, it could signal a problem. A flashing light might indicate an unstable connection, a faulty charging cable, or an internal battery issue. Ensuring the charging port is clean, using a reliable cable, and monitoring the charging status can help resolve this common problem and maintain consistent battery performance.

UE Boom Battery Replacement
Over time, even the best batteries degrade, making UE Boom battery replacement inevitable for older devices. Replacing the battery can restore the speaker’s full playback potential. While some models may allow user-friendly replacement, others might require technical assistance. Knowing when and how to perform a battery swap ensures that your UE Boom continues to operate efficiently without sacrificing portability or sound quality.

Maximizing UE Boom Battery Life
Extending your UE Boom battery life involves simple yet effective practices. Avoid overcharging, keep the speaker at moderate volume levels, and store it in a cool environment. Regular maintenance, combined with monitoring the battery status, ensures longer-lasting performance and fewer interruptions during use.

Conclusion
Understanding how to check UE Boom battery, how to tell if UE Boom is charging, why is my UE Boom charging light flashing, and when to consider UE Boom battery replacement are key to maximizing your speaker’s performance. With proper care and awareness, your UE Boom can deliver reliable, high-quality sound for years.

Mastering Your HP Laptop Battery: Tips and Tools for Longevity

Understanding Your Battery Laptop HP

A battery laptop HP is the heart of your portable computing experience. Over time, even the most reliable batteries will lose their capacity, affecting your device’s performance and daily usability. Knowing how to manage your battery properly can extend its lifespan and help you avoid unexpected shutdowns. Regular monitoring and smart usage habits are key to keeping your laptop running efficiently.

Finding the Right Model with HP Laptop Battery Finder

When your battery begins to show signs of wear, using an HP laptop battery finder can make the replacement process straightforward. This tool helps you identify the compatible battery for your specific HP laptop model. By entering details such as your laptop series and configuration, you can ensure that the new battery will fit perfectly and provide optimal performance without compatibility issues.

Efficient HP Laptop Battery Replacement

Sometimes, the only solution to maintain your laptop’s mobility is an HP laptop battery replacement. While replacing the battery may seem daunting, the process can be relatively simple if you follow safety guidelines. Removing the old battery and inserting the new one should be done carefully to avoid damaging internal components. A successful replacement will restore battery life, allowing you to work without constantly searching for a power outlet.

Managing Health with HP Battery Health Manager

Modern HP laptops often include tools like HP battery health manager, which can monitor and optimize battery performance. This feature helps regulate charging patterns, protect the battery from overcharging, and provide insights into its current state. Utilizing such tools ensures that your battery maintains its capacity over time and prevents premature wear, giving you confidence in your laptop’s reliability.

Regular HP Battery Check for Optimal Performance

Performing a routine HP battery check is essential to detect potential issues early. Checking the battery status through system diagnostics can reveal whether your battery holds charge efficiently or requires attention. Early detection of problems can prevent inconvenient shutdowns and help you plan for replacement before performance declines significantly.

Tips for Extending Battery Life

Beyond replacement and diagnostics, maintaining your HP laptop battery involves practical habits. Reducing screen brightness, avoiding extreme temperatures, and disconnecting peripherals when not in use can all contribute to longer battery life. Combining these habits with tools like the HP battery health manager and regular HP battery check ensures a consistently reliable experience.

Maximizing Your DJI Spark Experience: A Complete Guide to Battery Care and Maintenance

Understanding DJI Spark Battery Essentials
The DJI Spark battery is a core component that directly affects your drone’s performance. Designed to provide reliable flight time, it is important to understand its capabilities and limitations. On average, the DJI Spark battery offers around 16 minutes of flight under optimal conditions. However, various factors such as wind, temperature, and payload can influence the actual battery life. Being aware of these factors helps ensure a smoother flying experience and prevents unexpected mid-air power losses.

Tips for Prolonging DJI Spark Battery Life
Proper handling of the DJI Spark battery is crucial for maintaining its longevity. Always store the battery in a cool, dry place and avoid exposing it to extreme temperatures. Activating the DJI Spark battery hibernation mode when not in use is a smart practice. This mode reduces the battery’s discharge rate during storage, preserving its capacity and extending overall lifespan. Regularly cycling the battery by charging and discharging it partially can also help maintain optimal performance over time.

Dealing with DJI Spark Battery Not Charging
One common concern for drone users is when the DJI Spark battery is not charging. This issue can stem from a variety of causes, including a faulty cable, a damaged charger, or a depleted battery. It is advisable to check the DJI Spark battery charger and its connections first, ensuring that all contacts are clean and the charging ports are functioning correctly. Sometimes, simply resetting the battery by disconnecting it and reconnecting it to the charger can resolve minor issues.

Safe and Effective DJI Spark Battery Replacement
Eventually, even well-maintained batteries may require a DJI Spark battery replacement. When this time comes, selecting a battery compatible with your drone model and following proper installation procedures is essential. Always inspect the new battery for any visible damage before use, and allow it to fully charge using the DJI Spark battery charger before taking it on a flight. Replacing the battery on time ensures consistent performance and reduces the risk of mid-flight interruptions.

Optimizing Charging with the DJI Spark Battery Charger
The DJI Spark battery charger is designed to efficiently recharge your battery while minimizing the risk of overheating. Using the charger as intended, avoiding charging in extreme temperatures, and monitoring the charging process can prevent potential damage. For multiple batteries, consider charging them sequentially rather than simultaneously to maintain optimal temperature and charging efficiency.

Conclusion: Smart Practices for DJI Spark Batteries
Mastering the care and maintenance of your DJI Spark battery is key to enjoying longer flights and reliable drone operation. From understanding the battery’s capacity and using hibernation mode to properly handling charging issues and planning timely replacements, each step contributes to a smoother flying experience. Keeping these practices in mind ensures that your DJI Spark remains a dependable companion for all your aerial adventures.

Understanding Your Fitbit Battery: How Long It Lasts and When to Replace It

How Long Does Fitbit Battery Last?

If you own a Fitbit, one of the most common questions is, how long does Fitbit battery last? Generally, the lifespan of a Fitbit battery depends on the model, usage, and settings. Most models are designed to last between four to seven days on a single charge. Features like continuous heart rate monitoring, GPS tracking, and always-on display can reduce battery life significantly. Being aware of your usage patterns can help you maximize the time between charges.

How Long Does a Fitbit Charge 5 Last?

The Fitbit Charge 5 is one of the most popular models, known for its sleek design and advanced tracking features. When considering how long does a Fitbit Charge 5 last, users can typically expect up to seven days of battery life under standard use. However, heavy use of GPS or frequent notifications can lower this to around three to four days. Regularly monitoring your settings and adjusting notifications can help extend the Charge 5’s battery life.

How Long Does a Fitbit Last Before It Dies?

Many Fitbit owners worry about how long does a Fitbit last before it dies. Over time, all rechargeable batteries naturally lose capacity. Fitbit devices usually maintain good performance for two to three years before noticeable degradation occurs. Frequent full discharges or charging at extreme temperatures can accelerate battery wear, leading the device to die sooner than expected.

Signs Your Fitbit Is Dying

Recognizing the signs your Fitbit is dying can save frustration and ensure uninterrupted tracking. Common signs include a sudden drop in battery life, longer charging times, random shutdowns, or the device failing to hold a charge. If your Fitbit frequently needs charging or turns off unexpectedly, these are clear indicators that the battery may be failing.

Fitbit Battery Replacement

When your Fitbit battery no longer holds a charge, it might be time for a Fitbit battery replacement. Some models allow professional battery replacement services, while others may require sending the device in for repair. Regular care, such as avoiding overcharging and keeping the device away from extreme heat, can extend battery life and delay the need for replacement. Knowing when and how to replace the battery ensures that your Fitbit continues to provide accurate tracking without interruption.

Extending Your Fitbit’s Lifespan

Beyond battery replacement, there are simple habits that help your Fitbit last longer. Reducing screen brightness, limiting GPS usage, and turning off unnecessary notifications can all improve battery performance. Additionally, software updates often include optimizations that can help conserve battery, so keeping your device updated is essential.

iPhone 14 Series Showdown: Choosing Between Plus, Pro, and Standard Models

Design and Display Differences

When comparing iPhone 14 plus vs iPhone 14 pro, one of the most noticeable differences is the design and display. The iPhone 14 Plus offers a large screen with a familiar notch design, while the iPhone 14 Pro introduces a more advanced display with a smaller cutout and ProMotion technology, offering smoother animations. Similarly, when looking at iPhone 14 vs 14 pro, the standard model maintains a consistent design from previous generations, whereas the Pro model stands out with its superior screen quality and higher brightness levels. These differences are particularly important for users who prioritize media consumption or gaming experiences on their devices.

Camera Capabilities

Camera performance is another major distinction. In the iPhone 14 plus vs iPhone 14 pro comparison, the Pro model offers additional lenses and advanced photography features like ProRAW and enhanced low-light capabilities. This makes it appealing to photography enthusiasts who want more creative control. Likewise, in the iPhone 14 vs 14 pro comparison, the standard model has a solid dual-camera system suitable for everyday use, but the Pro version elevates the photography experience with a triple-camera setup and LiDAR sensor for better depth sensing and AR applications.

Performance and Chipsets

The performance gap is clear between standard and Pro models. When examining iPhone 14 plus vs iPhone 14 pro, the Pro model is equipped with the latest chipset, providing faster processing, improved graphics, and more efficient power management. Meanwhile, the iPhone 14 Plus retains the previous generation’s chip, which is still powerful for most tasks but may lag behind in intensive applications. Similarly, iPhone 14 vs 14 pro shows a significant difference in processing capabilities, which is crucial for users who run demanding apps or multitask heavily.

Battery Life and Usage

Battery performance is a key consideration. The iPhone 14 plus vs iPhone 14 pro comparison reveals that the Plus model typically has a longer battery life due to its larger size, making it ideal for extended use without frequent charging. In contrast, the Pro model’s high-refresh-rate display may consume more power despite its efficient chipset. In the iPhone 14 vs 14 pro scenario, both devices offer solid battery life, but users need to weigh performance features against endurance, especially if they rely heavily on the phone throughout the day.

Choosing the Right Model

Ultimately, deciding between iPhone 14 plus vs iPhone 14 pro or iPhone 14 vs 14 pro depends on your priorities. If you value advanced features, camera versatility, and cutting-edge performance, the Pro models are a strong choice. If longer battery life and a larger display are more important, the Plus and standard versions may be more suitable. By understanding the subtle differences in design, camera, performance, and battery, users can select the device that best fits their lifestyle and tech preferences.

A Complete Guide to Dyson SV12 Battery: Lifespan, Replacement, and Buying Tips

Understanding the Dyson SV12 Battery

The Dyson SV12 battery is one of the most essential components in ensuring your cordless vacuum performs at its best. Over time, batteries naturally degrade due to frequent charging and discharging cycles, which can reduce run-time and suction efficiency. Knowing how your Dyson SV12 battery functions and recognizing the signs of wear can help you maintain your vacuum in peak condition.

Options for Dyson SV12 Battery in New Zealand

For users based in New Zealand, searching for a dyson sv12 battery nz option can be slightly different compared to other regions. Availability, shipping, and compatibility need to be carefully checked before purchase. Many users in New Zealand look for batteries that not only fit the SV12 model but also come with safety features such as overcharge protection. Choosing the right battery locally can also minimize shipping delays and ensure faster replacement.

How to Replace Dyson SV12 Battery Step by Step

One of the most common questions among users is how to replace dyson sv12 battery. The process is relatively straightforward and does not require advanced technical skills. First, make sure the vacuum is switched off and disconnected from the charger. Using a simple screwdriver, remove the screws securing the old battery. Once the screws are out, gently slide the old battery out of its slot. Insert the new battery carefully, ensuring that it clicks into place, and reattach the screws. After completing these steps, your Dyson SV12 will be ready for charging and normal use again.

Extending the Life of Your Dyson SV12 Battery

While replacement is sometimes inevitable, taking care of your Dyson SV12 battery can prolong its life. Avoid overcharging the battery by unplugging it once it reaches full capacity, and try to keep the vacuum stored in a cool, dry place. It’s also best to use the vacuum until the battery is nearly empty before recharging, as this can help maintain its efficiency over the long term. Regular cleaning of the vacuum filter and preventing blockages can also reduce strain on the battery, ensuring better overall performance.

Final Thoughts

Whether you are looking for a dyson sv12 battery nz option or simply learning how to replace dyson sv12 battery, being informed about your vacuum’s power source helps you keep it running smoothly. With proper maintenance and timely replacement, the Dyson SV12 can continue to deliver strong suction and reliable cleaning for years.

Mastering the DJI Mavic Air Battery: Usage, Replacement, and Maintenance

Understanding the Mavic Air Battery

The Mavic Air battery is the power source that keeps the compact drone airborne, enabling smooth flights and high-quality aerial shots. Also known as the DJI Mavic Air battery, it is designed with intelligent features that allow real-time monitoring of charge levels, temperature, and overall health. For drone enthusiasts, understanding how this battery works is essential to ensure safe and efficient flying sessions.

When to Consider a Mavic Air Battery Replacement

Over time, any rechargeable battery will lose capacity, and the same is true for the DJI Mavic Air. Signs that you may need a Mavic Air battery replacement include significantly reduced flight time, difficulty in holding a charge, or repeated warning signals during use. Replacing the battery not only restores longer flight sessions but also prevents the risks associated with power failures mid-air. Choosing a reliable replacement ensures that your drone continues to perform at its best.

The Role of the Mavic Air Battery Charger

Keeping your battery healthy depends heavily on how it is charged. The Mavic Air battery charger plays a crucial role in maintaining battery life, as it regulates the charging process to prevent overheating or overcharging. Pilots should always follow best practices, such as charging in a cool environment and avoiding constant overcharging. With proper care, the battery’s lifespan can be significantly extended, ensuring consistent performance.

Performing a Mavic Air Battery Reset

Occasionally, users may encounter software or charging issues with their drone power source. In such cases, a Mavic Air battery reset can help resolve errors and restore normal functionality. This process often involves draining the battery completely and recharging it fully, or performing a reset sequence to recalibrate the system. Knowing when and how to reset can prevent unnecessary replacements and keep the DJI Mavic Air running smoothly.

Tips for Maximizing Battery Performance

Beyond charging and replacement, proper usage habits make a big difference. Avoid flying in extreme temperatures, store the battery partially charged when not in use, and perform regular checks on its condition. By combining careful charging, occasional resets, and timely replacements, drone pilots can get the most out of their DJI Mavic Air battery and enjoy longer, safer flights.

Everything You Need to Know About Key Fob Battery Replacement

Why the Key Fob Battery Matters

Modern vehicles rely heavily on remote entry systems, and the small but powerful key fob battery is what makes this convenience possible. When the battery inside the fob starts to weaken, you may notice reduced signal range, slower response when pressing buttons, or even complete failure to unlock the car. Addressing this issue early saves you from the frustration of being locked out of your vehicle at the most inconvenient moment.

Understanding the Nissan Key Fob Battery

For Nissan owners, the key fob battery plays a crucial role in enabling smooth access to the car and activating push-to-start functions. A weak or dead Nissan key fob battery can prevent the car from recognizing the fob, leaving you unable to start the engine without backup methods. Fortunately, these batteries are relatively easy to replace and are widely available, making it simple to restore your fob’s full functionality.

The Process of Key Fob Battery Replacement

Performing a key fob battery replacement is a straightforward task that most drivers can manage on their own. The process usually involves opening the casing of the fob, carefully removing the old battery, and inserting a fresh one of the correct type. While each car brand may have small differences, the steps are generally intuitive. Taking care to align the new battery properly ensures the fob will work immediately after the replacement.

Signs It’s Time for a New Battery

It’s helpful to know when a replacement is due. Common signs include having to press the buttons multiple times before the car responds, reduced range, or no signal at all. In the case of a Nissan key fob battery, a dashboard warning may even appear when the power is running low. Paying attention to these early indicators gives you enough time to handle the problem before it disrupts your daily routine.

Extending the Life of Your Key Fob Battery

Although batteries naturally lose power over time, there are ways to make them last longer. Keeping the fob away from extreme temperatures, avoiding unnecessary button pressing, and storing it away from electronic interference can help preserve battery life. By following these simple habits, you’ll reduce the frequency of key fob battery replacement and keep your car access reliable.

Conclusion: Stay Prepared and Hassle-Free

Whether it’s a general key fob battery or a specific Nissan key fob battery, keeping it in good condition is essential for convenience and security. Knowing how to recognize the signs of a weak battery and performing a quick key fob battery replacement when needed ensures that you’ll never be caught off guard. A small effort today can save you from big frustrations tomorrow.