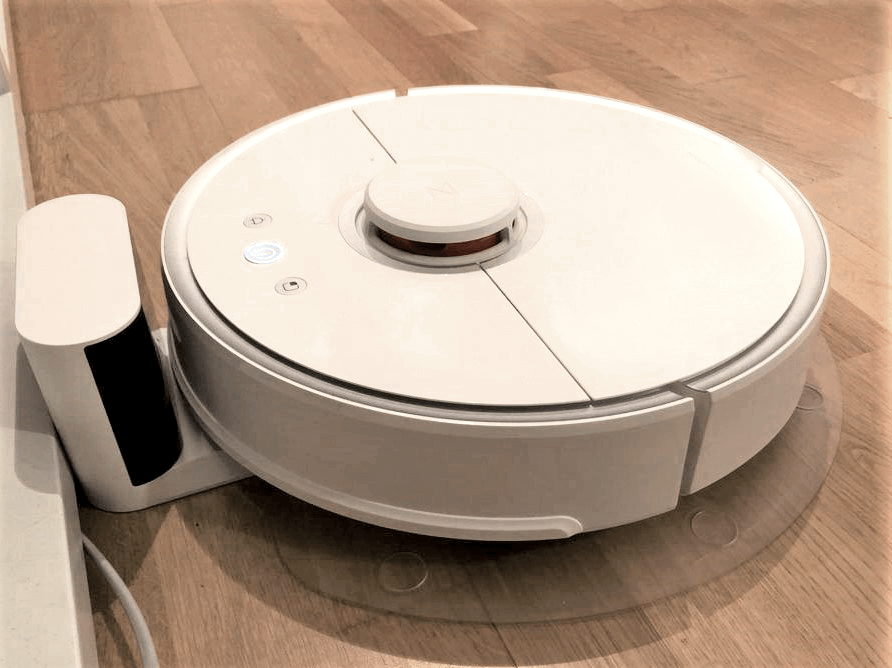
We are specialists in quality batteries. We have batteries, chargers and accessories for everything you can think of. Low prices, big inventory, expert advice. Find your battery here!
The WORX battery is at the heart of the brand’s cordless tool lineup, powering everything from lawn mowers to drills with quiet efficiency and mobility. Designed with lithium-ion technology, these batteries offer lightweight convenience and consistent performance. Whether you’re a homeowner tending to a garden or a DIY enthusiast working in your garage, a reliable battery makes all the difference.
How Long Does a WORX Battery Last?
The question many users ask is: how long does a WORX battery last? The answer depends on two main aspects — runtime per charge and total lifespan over months or years. Typically, a WORX 20V battery can power tools for anywhere between 20 minutes to an hour, depending on the type of tool and workload. For example, a string trimmer will consume more power than a simple cordless screwdriver. As for longevity, these batteries generally last about 2 to 3 years with moderate use before noticeable capacity loss occurs.
Factors Affecting Battery Performance
Battery performance isn’t just about watt-hours; usage habits, storage conditions, and charging cycles all play a role. Frequent over-discharge, leaving the battery in extreme temperatures, or not using it for extended periods can shorten its lifespan. On the other hand, storing it in a dry, moderate environment and charging it properly can extend its usefulness. Keeping a backup battery is also a smart way to maintain workflow while one is charging.
Replacing and Upgrading WORX Batteries
Eventually, every battery reaches the end of its service life. When it’s time to replace your WORX battery, compatibility and capacity should be top considerations. Some users opt for higher amp-hour options, which can offer longer runtime without switching to a different voltage platform. It’s also worth considering how new batteries can breathe life into aging tools, making them feel like new again.
Why WORX Batteries Are a Smart Choice
WORX batteries stand out not only for their performance but also for their cross-compatibility across a wide range of tools in the same voltage class. This shared platform approach allows users to invest in multiple tools without the need to purchase a separate battery for each one. It’s an efficient, practical system that promotes convenience and value over time.
Final Thoughts
If you’re investing in cordless tools, battery performance and durability matter. Whether you’re new to the platform or wondering how long does a WORX battery last, the answer depends on how you use and maintain it. With proper care and smart charging habits, a WORX battery can provide years of reliable service — making it a strong choice for those seeking flexibility and freedom in their toolkits.
The Samsung Jet 90 battery is at the heart of this powerful cordless vacuum cleaner, delivering strong suction and flexible cleaning performance. Designed to support extended run times, the battery provides up to 60 minutes of use under optimal conditions. This makes it highly convenient for larger homes or deep-cleaning sessions. However, like all lithium-ion batteries, its performance will gradually decline over time due to repeated charging cycles and regular use.
If you’ve noticed that your vacuum is not holding a charge as it once did, or if the run time has drastically decreased, it might be time to consider a Samsung Jet 90 battery replacement. A deteriorating battery not only affects cleaning efficiency but may also cause unexpected shutdowns during operation. Replacing the battery is a practical solution that breathes new life into your device without the need to invest in a new vacuum.
How to Approach the Replacement Process
Replacing the battery in your Samsung Jet 90 is a relatively simple task. The vacuum is designed with a removable battery system, allowing users to easily swap it out without tools or technical knowledge. Simply detach the old battery from the unit and snap the new one into place. It’s also possible to keep an extra battery charged and ready to go, which is especially useful for tackling larger cleaning jobs in one go.
Things to Consider When Buying a New Battery
Before purchasing a new battery for your vacuum, it’s important to verify compatibility with the Jet 90 model. While many battery options exist on the market, not all are guaranteed to perform consistently. Make sure to look for user feedback and specifications that align with the Samsung Jet 90 battery requirements. Inconsistent or underperforming alternatives may lead to shorter lifespans or inefficient charging.
Enhancing the Life of Your Samsung Jet 90 Battery
Whether you’re using the original unit or have opted for a Samsung Jet 90 battery replacement, proper care can extend the lifespan significantly. Avoid leaving the battery plugged in for long periods after it’s fully charged, and store it in a cool, dry place when not in use. Regular maintenance of the vacuum itself—such as cleaning filters and emptying the dustbin—also helps reduce strain on the battery.
Final Thoughts
The Samsung Jet 90 battery plays a crucial role in maintaining the high performance of this premium vacuum cleaner. When battery issues arise, opting for a Samsung Jet 90 battery replacement can restore functionality and extend the life of your device. For users seeking consistent cleaning power, understanding and managing battery health is key to getting the most out of their Jet 90 experience.
The DJI Spark battery is at the heart of the drone’s performance, providing the energy required for flight, navigation, and camera stabilization. This intelligent battery uses LiPo (Lithium Polymer) technology, offering a balanced combination of lightweight construction and high output. It is specifically designed to fit the compact form factor of the DJI Spark, making it an essential component not only for powering the drone but also for ensuring safe and efficient energy management during each flight session.
How Long Does DJI Spark Battery Last in Real-World Conditions?
One of the most frequently asked questions by drone enthusiasts is: how long does DJI Spark battery last? Under ideal conditions, the battery can deliver up to 16 minutes of flight time on a full charge. However, real-world use may vary depending on factors like wind resistance, flight speed, temperature, and even how aggressively the drone is maneuvered. In moderate conditions with steady flying, most users report between 12 to 14 minutes of usable flight time. Knowing this, it’s always smart to plan your shots and flights in advance to maximize each battery cycle.
Charging and Maintenance Tips for Longer Lifespan
To get the most out of your DJI Spark battery, proper charging habits are key. It’s recommended to use a balanced charger that supports intelligent battery communication to avoid overcharging. Allow the battery to cool down after use before charging again, and try to store it at around 50% charge if you’re not flying for a while. Regularly updating your drone’s firmware can also enhance battery management efficiency and prolong overall lifespan.
Flight Planning and Backup Batteries
Given the limited flight time, it’s common practice among Spark users to carry multiple batteries. This allows for extended aerial sessions without long waiting periods for recharging. Keeping your extra batteries stored in a safe, dry place, and rotating their usage, can help maintain even wear and prevent capacity loss. For content creators or hobbyists exploring new environments, having a backup battery can make the difference between a quick flight and a productive outing.
Is It Time to Replace Your Battery?
Over time, the performance of the DJI Spark battery can diminish, especially after numerous charging cycles. Signs such as reduced flight time, swelling, or inconsistent power delivery may indicate it’s time to look for a replacement. Always monitor the health of your battery through the drone’s app interface to ensure it is functioning safely and efficiently.
Final Thoughts
If you’re asking how long does DJI Spark battery last and how to make the most of it, the answer depends not only on the battery itself but also on how well you manage it. The DJI Spark battery is a powerful and intelligent component, and with the right care, it can continue delivering reliable performance for many flights to come. For those seeking extended flying time, investing in an extra DJI Spark battery is a smart way to keep the adventure going.
Laptops have become essential for both work and personal use, but their performance largely depends on battery health. Over time, HP laptop batteries can degrade, resulting in shorter battery life and unpredictable shutdowns. If you’re experiencing these issues, it might be time to consider an HP battery replacement NZ service. Replacing a failing battery can restore mobility and reliability, ensuring you’re not tethered to a charger throughout the day.
Common Signs of Battery Wear
You might notice your laptop runs out of power much quicker than it used to, or it might not charge beyond a certain percentage. Other symptoms include overheating during simple tasks or a sudden drop from 40% to 0%. These are all signs that your battery has reached the end of its useful life. If you’re based in New Zealand and your HP laptop exhibits these issues, seeking an HP battery replacement NZ service could be the ideal solution.
Where to Look for Replacement Options
When it comes to finding a compatible battery, it’s important to consider both the model of your HP laptop and your specific usage needs. In New Zealand, various electronics retailers and tech repair services offer replacement batteries that match different HP series. Whether you use your device for business, study, or creative work, a reliable battery is crucial for uninterrupted performance.
Professional Replacement vs. DIY
Some users may be tempted to replace the battery themselves, especially if it seems like a simple task. While possible in some models, HP laptops often feature internal batteries that require disassembly and delicate handling. A professional HP battery replacement NZ service ensures that the new battery is correctly installed, the connections are secure, and your device is tested before being returned to you.
Keeping Your New Battery in Top Shape
Once your battery has been replaced, it’s worth adopting a few habits to extend its lifespan. Avoid keeping your laptop plugged in at 100% for long periods, and try to keep the battery level between 20% and 80% during daily use. Regular updates and moderate brightness settings can also help optimize battery performance.
Conclusion: Restore Freedom to Your Workflow
If your device can’t last more than a couple of hours without being charged, it’s time to act. A timely HP battery replacement NZ service not only restores your laptop’s mobility but also enhances your overall productivity. With a new battery, you can once again enjoy the convenience of working anywhere, without interruptions or anxiety about your battery percentage.
Performance Depends on the Battery The Samsung Jet 60 vacuum cleaner is well-known for its cordless convenience, sleek design, and powerful suction. But like all cordless appliances, its efficiency is tightly linked to battery health. The Samsung Jet 60 battery is a lithium-ion unit that provides the power needed for uninterrupted cleaning sessions. Over time, however, even high-quality batteries lose their capacity, resulting in shorter run times and reduced performance.
Signs You Might Need a Battery Replacement Frequent charging, reduced suction time, or a vacuum that shuts off quickly could all be indicators that the Samsung Jet 60 battery is no longer performing at its best. If you find yourself unable to clean a room without needing to recharge, it may be time to consider a Samsung Jet 60 battery replacement. Regular usage, charging habits, and the age of the device all contribute to battery wear.
Choosing the Right Replacement Battery When it comes to a Samsung Jet 60 battery replacement, compatibility and capacity are key. It’s important to select a battery that matches the voltage and size specifications of your Jet 60 to ensure safe and efficient operation. Many compatible options are available that meet these criteria and provide the same—if not better—battery life as the original.
Installation and Maintenance Tips Replacing the battery on the Jet 60 is generally straightforward. Most units feature a detachable battery pack that can be swapped out without tools. Once replaced, it’s advisable to avoid deep discharges and store the vacuum in a moderate-temperature environment to preserve battery life. Regular filter cleaning can also reduce strain on the new battery.
Extend the Life of Your Jet 60 With the right approach, a Samsung Jet 60 battery replacement can breathe new life into your vacuum. Instead of investing in a whole new unit, simply replacing the battery allows you to continue enjoying the performance of your Jet 60. It’s an easy, cost-effective way to extend your vacuum’s usability and efficiency.
If your Jet 60 seems to be losing steam, don’t rush to replace the entire vacuum. A compatible replacement battery might be all you need to restore your cleaning power.
A Toshiba laptop battery plays a crucial role in the overall performance and mobility of the device. Whether you’re working remotely, attending online classes, or simply enjoying some entertainment, a reliable battery is key to uninterrupted usage. Over time, however, even the best-performing batteries can encounter issues, from reduced lifespan to charging irregularities.
Why Is My Toshiba Laptop Battery Light Blinking?
One of the most common questions users ask is: “why is my Toshiba laptop battery light blinking?” This blinking indicator can signal a range of problems, depending on the color and frequency. A steady amber blink might mean the battery is critically low and not charging, while a flashing white or orange light can suggest a battery error, a charging issue, or even a system conflict. Understanding the pattern can help you diagnose the root cause more accurately.
Possible Causes Behind the Blinking Light
Several factors may lead to your Toshiba laptop battery light blinking. It could be as simple as a loose power connection or as complex as an aging battery that no longer holds charge. In some cases, temperature fluctuations or a faulty AC adapter might disrupt the charging process. Internal system misconfigurations or outdated BIOS versions can also interfere with battery detection, triggering the blinking alert.
What You Can Do to Fix It
Before jumping to battery replacement, it’s worth performing a few basic checks. Ensure the power cable is securely plugged in and the charging port is clean and undamaged. Restarting the system or removing and reinserting the battery (if detachable) may help reset the battery’s behavior. If the blinking persists, checking the battery status via system diagnostics or updating power management drivers may resolve the issue.
When to Consider a New Toshiba Laptop Battery
If your laptop continues to show irregular charging behavior or the battery life has drastically shortened, it might be time to replace the Toshiba laptop battery. A deteriorated battery can not only affect performance but also pose safety risks. Always monitor battery health periodically and seek a replacement when signs of aging become consistent, such as rapid draining or inability to charge fully.
Conclusion: Stay Informed and Proactive
To sum up, if you’re wondering why is my Toshiba laptop battery light blinking, the answer often lies in the battery’s condition or the charging system’s stability. Being proactive with maintenance and aware of warning signs can extend your laptop’s life and ensure smoother operation.
If you’re looking for a portable, IP67 waterproof Bluetooth speaker, Sprout’s Soundwave speaker could be the one for you. We check it out.
Headphones may be a great way to enjoy your Spotify playlist privately, but if you’re entertaining at home, camping, or relaxing on the beach, you may want to share your music. For this, you are going to need a Bluetooth speaker like Sprout’s Soundwave speaker.
Sprout is an Aussie company that designs speakers, headphones, chargers and phone accessories. They pride themselves on being sustainable and ethical, with a mission to enhance our world not just for today but for tomorrow as well. They do this via using recyclable packaging and examining the impact of their end-to-end supply chain, including end-of-life disposal.
Sprout’s Soundwave Bluetooth speaker stands 150mm high and weighs only 680g, making it the perfect size for sticking in your bag. The speaker features twin 47mm drivers and a 24W output, so you’re not really compromising power for portability. The speaker comes with a USB Type-A to Type-B charging cable, a strap, and the manual.
On the front of the speaker is a rubber panel with a power button, play button, volume buttons and a Unisync button for syncing up to 50 Sprout Bluetooth speakers. There’s also a bank of four battery charge indicator lights. A status light at the top of the rubber panel flashes red and blue for Bluetooth pairing and a solid blue when paired.
Behind a little rubber cover on the back of the speaker is a charging input, a 3.5 mm aux input. There’s also a 5W USB Type-A output, as the Soundwave speaker doubles as a power bank.
Connecting the device to my phone was painless. Following the instructions, the speaker appeared on my phone’s list of Bluetooth devices and paired with no fuss, with a voice prompt confirming that it was connected. A vocal cue will also let you know if the device needs charging. You should see around 14 hours between charges.
The speaker’s sound quality is great, but maybe a little pedestrian for those wanting to really upset the neighbours. For a bit of background music to accompany an alfresco meal or while doing chores, the Soundwave will do the job. If it’s a dance party you are after, you are likely going to need something with a bit more meat. Alternatively, you could buy a few more Sprout Bluetooth speakers and sync them together if you really need some extra volume.
The speaker seems quite rugged, but you do need to be mindful of the exposed drivers at each end. They are sealed in with rubber and look cool with the Sprout logo, but I’d like to have seen them with mesh covers, just to make sure they don’t get pierced by something in my bag.
Sprout’s Soundwave Bluetooth speaker does what it says on the tin. It’s a robust, very portable speaker for sharing music when you are out and about. It’s waterproof, so there are no problems if you are by the pool or on the beach. The audio is crisp, and it even acts as a power bank. The multi-speaker Unisync mode is pretty cool as well. All-in-all, it’s a competent device that’s worth a look if you are in the market for a portable Bluetooth speaker.
The eero 7 is now the most affordable Wi-Fi 7 router in the company’s range. It is designed to deliver multi-gigabit speeds and enhanced connectivity in a compact and accessible form factor. Priced at NZD $319.99 for a single unit and NZD $699.99 for a three-pack, the device targets customers looking to upgrade to the latest Wi-Fi standard without a high upfront cost. Coverage offered by a single eero 7 unit spans up to 190 square metres, while a three-pack extends coverage to 560 square metres. The device supports both 2.4 GHz and 5 GHz bands and can achieve wireless speeds of up to 1.8 Gbps, with wired speeds reaching up to 2.3 Gbps using its two 2.5 GbE ports.
eero Pro 7 features
The eero Pro 7 is intended for households with high connectivity demands, such as those that require capacity for hundreds of devices or utilise large amounts of bandwidth. This model features tri-band support across 2.4, 5, and 6 GHz, maximising spectrum use to reduce congestion and maintain performance in busy Wi-Fi environments. Its wireless speeds can reach up to 3.9 Gbps, and the device features two 5 GbE ports for wired connections with speeds up to 4.7 Gbps. The Pro 7 is priced at NZD $599.99 for a single unit and NZD $1,299.99 for a three-pack.
Both the eero 7 and eero Pro 7 are powered by eero’s proprietary TrueMesh, TrueRoam, and TrueChannel technologies. These capabilities allow the routers to adapt in real time to changing network conditions by automatically optimising channel selection, dynamically connecting users to the best available unit, and managing data traffic to avoid interference from neighbouring networks.
Technologies and performance
The Wi-Fi 7 standard, which both new devices support, brings improved network throughput, increased device capacity, and lower latency compared to previous generations. Features such as Multi-Link Operation, Orthogonal Frequency Division Multiple Access, and 4K-QAM ensure that more devices can communicate simultaneously and data is transmitted more efficiently.
Additional features on both devices include support for advanced encryption and WPA3 security protocols, over-the-air software updates for security and functionality, and backward compatibility with earlier generations of eero products. Both the eero 7 and eero Pro 7 function as smart home hubs and include support for Matter, Thread, and Zigbee devices, allowing users to connect a wide range of smart home products via Alexa.
The increasing demand for reliable and high-capacity Wi-Fi has driven interest in mesh and advanced wireless systems in New Zealand households, particularly as more residents work or study from home and rely on multiple connected devices. Jacqueline Lipman, APAC Managing Director at eero, commented on the expansion:
“We are excited to bring advanced performance to Kiwi homes through our expanded eero range. Whether customers prioritise affordability or premium features, our lineup meets every household’s needs – from powering home offices and streaming across multiple devices to staying connected with family overseas,” said Jacqueline Lipman, APAC Managing Director, eero. “As connectivity becomes increasingly essential for Kiwi consumers, the new eero 7 and eero Pro 7 help simplify everyday life by delivering reliable connections in our complex digital world.”
The eero app, which accompanies the hardware, gives users the ability to set up and manage their networks within minutes, pause internet access, and view connected devices. The app recently underwent a redesign aimed at improving navigation and device monitoring for users. Subscribers to the eero Plus service, available for AUD $15.99 per month or AUD $159.99 per year, gain access to additional security features, parental controls, and internet backup during outages, as well as third-party security software.
The Deebot T50 Max Pro OMNI from Ecovacs Robotics is a robot vacuum and mopping system that uses 3D LiDAR technology to map your home. It comes with a station unit that automatically replenishes water and disposes of waste.
For nearly four years, my trusty Deebot N8 Pro has been soldiering on, haplessly vacuuming up the mess that a house with three kids, a cat and a dog leaves behind. I wouldn’t say life has been easy for the little robot vacuum cleaner. But it is the perfect environment to test the new Ecovacs Deebot T50 Max.
In the box you’ll find the Deebot T50 Max robot, the Omni Station, a base ramp, a side brush, a power cord and a brief instruction manual. Before you start using the Deebot, you need to download the Ecovacs Home app from either the Apple Store or Google Play. I already had the app installed as my Deebot N8 Pro is already on cleaning duty. You can have more than one Ecovacs robot on the app, for instance, if you use separate vacuums for different levels in your house. It’s a great app, and very robust, giving you full control of your robot vacuum, including mapping and cleaning settings.
After you’ve got the app, there’s a little bit of setting up, mainly removing the blue tape holding the bits together during transit. Then you just need to fix the base into the OMNI station and click the side brush into the robot. You’ll also need to hook up the dust bag and fill the water tank in the Omni station. After powering up the Omni station, placing the robot in the dock will start the charging cycle.
From the Ecovacs app, selecting “add device” will pair the new robot. You need to connect your phone to a 2.5GHz Wi-Fi channel (or a mixed network), as the device only supports 2.5GHz Wi-Fi connections. You’ll need your Wi-Fi password to complete the network connection.
From now on, interaction with the actual Deebot T50 Max is kept to a minimum. The Omni Station services and maintains the robot, filling it with water and emptying it of dust and dirty water, as well as cleaning off the mopping pads. There’s also an optional tank for Ecovacs’ cleaning fluid, which is available separately. It’s a shame that a pot of cleaning fluid isn’t included in the box, as it’s probably a good idea to use it to keep things cleaner.
The Omni Station is a game changer, making the T50 Max an autonomous cleaning system that requires minimal intervention. But there are some disadvantages compared to the old Deebot dock employed by my old N8 Pro. Whereas I could tuck the old dock out of the way somewhere, the Omni Station is a rather large bit of kit. It has a footprint, including the ramp base, of 45cm x 33cm and stands about 50cm high. It also needs 50cm clearance on each side and 80cm clearance at the front. To be fair, though, it’s no bigger than a kitchen bin, but still worth noting.
Anyone who’s used a regular robot vacuum, or even one of Ecovacs’ earlier Deebots will see the value in the Omni Station. My N8 Pro will happily continue to go through the motions of vacuuming the house with the little dust compartment stuffed to overflowing with debris. You then have to pluck out the compartment and pick out the fluff and dust into your bin. There’s a similar tiresome interaction with the N8’s mopping function, which is again redundant with the T50 Max’s automated Omni Station.
The Omni Station does provide a bit of a false sense of security. It’s dreadfully easy to completely forget about the vacuum once you’ve set up a cleaning schedule. You can be at work whilst the device vacuums your carpets and mops the floors and completely forget that the thing exists. But you do need to check that there’s water (and cleaner if you are using it) in the tank(s) and that the dirty water tank and the dust bag aren’t full. The mop pad cleaner also needs the occasional rinse, as does the mop cleaning area. You will get alerts from the app when maintenance is required, but it’s best to keep on top of it, rather than have your autonomous cleaning schedule disrupted.
The robot does an exceptional job of not getting caught up in items lying around the house. Whilst the instructions state that you need to make sure your floors are clear of obstacles, in reality, that’s not always going to work. Occasionally, the kids will leave something lying around that’s too much for it, but compared to my old N8, the Deebot T50 Max avoids sucking up cables and socks without any drama.
It’s not all plain sailing, though. A few times, the robot lost a mopping pad. Whilst the app alerted me to this issue, the robot had moved on, leaving the whereabouts of the missing mopping pad a bit of a mystery. Mishaps such as this are few and far between.
The robot has no problem detecting the difference between carpet and tile, keeping the brush up to avoid smudging your carpet. You need to be mindful if you have a particularly deep pile carpet, as the mop pads may not be high enough to clear the fabric.
All the robot’s clever technology, which includes LiDAR 3D mapping, ultrasonic carpet detection, infrared ranging and a microphone and an AI camera, is filtered to the end user via the Ecovacs app. Despite the high level of technology and automation at work, the Deboot T50 Max is simple and easy to use.
You can set the vacuum off by just pressing the start button. The first time, the robot will map your home, noting where rugs and carpets are. It will also detect and map the various rooms, labelling them for reference.
As you get used to the Deeboot you can start experimenting with the settings. You can select the way the robot cleans, i.e. vacuum and mop, vacuum first and then mop or just switch on intelligent hosting and allow the robot’s AI to select the best way to proceed for you. Setting up a cleaning schedule allows you to leave the robot to clean while you are at work or at any other convenient time, without any further intervention.
The app also allows access to the T50’s onboard 960P camera, which Ecovacs suggests can be used to monitor your home remotely. Whilst that’s sort of true, it’s not that practical, as you can’t directly control the path of the robot. The robot’s patrol mode, however, converts Deebot into an autonomous security guard, well, more like a moving security camera, as it trundles around your house snapping pictures. You can also remotely watch the live-streamed video from the robot’s camera. This is a cool bonus to complement your home security setup.
As well as being compatible with the likes of Amazon’s Alexa, the T50 Max Pro comes with its own voice assistant, called YIKO. When switched on via the app, saying “OK Yiko” and a command like, say, “clean the kitchen” will start the robot and have it follow your command. You can use this to quickly have the robot clean a spill in a particular area rather than open the app or commence a full house clean.
The scalability of the T50 Max Pro is its biggest strength. It’s easy to set the device off and get a great result without having to check the manual or wade through countless options in the app. But if you want to use the more powerful commands and automation, it’s all there for you. This is exactly what you should be looking for in a piece of technology.
The Ecovacs Deeboot T50 Max Pro Onmi is an impressive bit of kit that makes a big dent in your housework chores. Easy to use, but incredibly thorough and effective, Ecovacs has produced an AI-driven autonomous vacuuming and mopping system that is virtually unflappable. The Omni station automates most of the maintenance duties, allowing the device to potentially clean for weeks without needing any human interaction. The patrol mode and streaming video feed are added bonuses that make the robot even more futuristic. It’s an incredible cleaning machine that’ll leave you wondering what you ever did without it.
With both Bluetooth and 2.4GHz capabilities, the budget-friendly SteelSeries Rival 3 Wireless is a bit of a head turner.
Complementing the usual black and white colours for their mice, for the second generation of the Rival 3 Wireless mouse, SteelSeries is offering more avant-garde aqua blue and lavender purple alternatives. We received the aqua version of the mouse to try out.
And it looks fantastic. The box doesn’t do the aqua colour of the mouse justice. It also features a lightly textured matte finish that makes it stand out even more.
The mouse is symmetrical, so if you are a lefty who, out of principle, feels the need to use a mouse in their left hand, you can with this mouse. You may have trouble using the two buttons on the left side, but that’s what you get for being awkward (and I say this as a lefty- that uses a mouse in my right hand).
The mouse comes with two AAA batteries in the box, which fit in a compartment under the palm area. SteelSeries states that the batteries should last you 175 hours using the 2.4GHz dongle or 450 hours with Bluetooth. You can even remove one of the batteries to reduce the weight by 11g if you want to make the mouse lighter. Personally, I found the weight, at 106g, to be about right.
Tucked away in the battery compartment is the 2.4GHz USB dongle. It’s good to see a device that has a place to store the dongle, so you don’t lose it if you are on the go. Whilst the mouse is Bluetooth as well, you will get better response times (polling rate) using the dongle.
The SteelSeries GG software (available as a free download from the SteelSeries website) is a bit pushy and wants to become your gaming hub. It would be nice to have a more streamlined app that only manages your device rather than wanting to manage your entire gaming life. The GG app “Engine” area is where you can update your SteelSeries devices and adjust options.
For the Rival 3, you can customise the six buttons with keystrokes or macros, set the DPI (including the middle button sensitivity toggles), adjust movement acceleration/deceleration, angle snapping and polling rate. There are also options to extend battery life, smooth Bluetooth cursor movement, and enhance wireless stability if you are getting interference. The GG software saves options to the mouse once set, so you can use it on other devices without the app.
There is an LED light in the scroll wheel, but this only seems to light up when pairing with Bluetooth. The only other time it seemed to light up is to warn when the battery is getting low. I’d expect, though, for lighting to be minimal with a battery-powered mouse to extend the time between battery replacements.
Using the mouse is a breeze. It’s very responsive and glides across your mouse mat on its three PTFE feet. The buttons have a reassuringly positive click about them and are built to last, with SteelSeries boasting that the mouse uses sixty million click switches.
For what purports to be a budget-friendly peripheral, the SteelSeries Rival 3 Wireless Gen 2 mouse certainly stands out. Not only does it look good, but it also feels solid. Having to replace the batteries is a bit of a downer, but you can’t have everything with a sub-AU$100 mouse. Overall, it’s a stylish mouse that performs well and offers excellent value for money.